Juicy Air Fryer Meat Recipes You Must Try
Most people treat their air fryer like a microwave. They set the timer, walk away, and hope for the best. But meat doesn't work that way.
Air Fryer Meat Recipes succeed when you watch the food closely. The rapid circulating air creates unique visual cues. You need to spot the difference between golden brown and burnt.
This guide teaches you how to read your protein.
We've analyzed manufacturer specs and USDA guidelines as of 2026. Internal temperature remains the only true safety metric. Yet, visual texture determines flavor and juiciness.
Ignoring either leads to dry or unsafe meals. Let's look at why your eyes matter more than the clock.
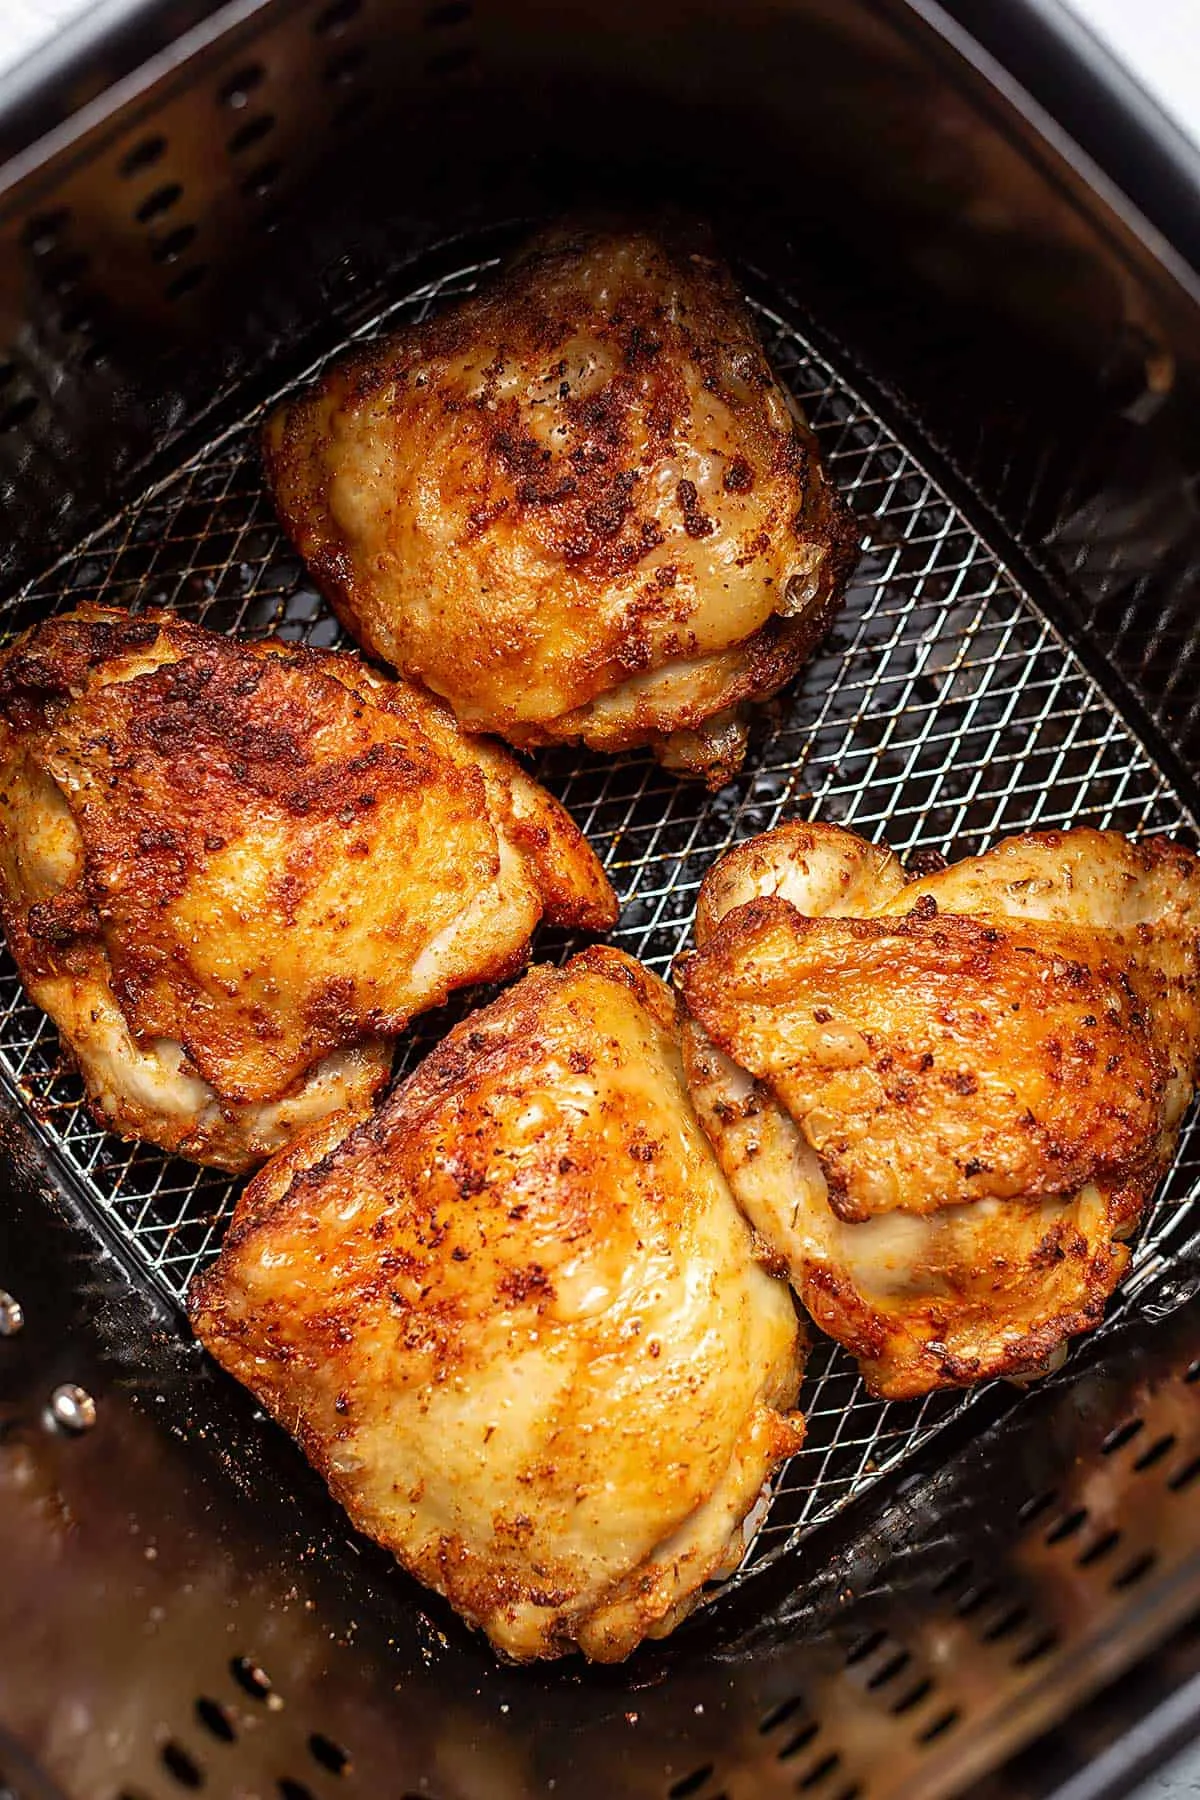
Image source: Web (Bing) / jenniferbanz.com (Web image (fair-use with source credit))
â±ï¸ Chef Jessica’s Quick Recipe Snapshot
Air Fryer Verified
- Single Layer Only: Never stack or overlap in the basket; circulating high-velocity air creates the crisp barrier.
- Oil Sprayer Tip: Lightly mist with high smoke-point avocado or light olive oil (never use commercial aerosol sprays with propellants).
- Halfway Shake / Flip: Flip pieces halfway through the cycle to ensure uniform convection browning.
Quick Answer
Air Fryer Meat Recipes rely on visual cues over timers. Look for golden-brown crusts and opaque interiors. Use an instant-read thermometer to verify doneness.
Chicken needs 165°F internal temperature. Beef steaks require 145°F plus a three-minute rest. Always pat meat dry before cooking.
Arrange pieces in a single layer. Flip halfway through for even browning. Avoid overcrowding the basket.
High sugar marinades burn quickly. Apply glazes in the final minutes. Monitor rendered fat to prevent smoking.
Adjust time based on thickness. Rest meat after cooking. These steps ensure juicy, safe results every time.
â±ï¸ Chef Jessica’s Quick Recipe Snapshot
Air Fryer Verified
- Single Layer Only: Never stack or overlap in the basket; circulating high-velocity air creates the crisp barrier.
- Oil Sprayer Tip: Lightly mist with high smoke-point avocado or light olive oil (never use commercial aerosol sprays with propellants).
- Halfway Shake / Flip: Flip pieces halfway through the cycle to ensure uniform convection browning.
Why Your Eyes Matter More Than The Timer
Timers are just suggestions in an air fryer. Actual cook times vary wildly by model wattage. A 1500-watt unit cooks faster than a 1200-watt one.
Thickness also changes everything. A thin chicken breast dries out in twelve minutes. A thick thigh might need eighteen.
Relying solely on the clock guarantees inconsistency. You end up with rubbery poultry or charred steak. Visual monitoring solves this problem instantly.

Look for color shifts instead of counting seconds. Poultry skin should turn deep amber, not pale yellow. Beef develops a tan-to-brown Maillard crust.
Pork transitions from pink to opaque gray-white. These changes signal chemical reactions happening correctly. If the surface looks wet, it’s steaming, not frying.
That means moisture is trapped inside. Open the drawer early to check progress. Modern units pause automatically when opened.
You lose minimal heat but gain critical data. Trust your eyes first, then confirm with a probe. This hybrid approach prevents guesswork errors.
It builds confidence in your cooking skills.
â±ï¸ Chef Jessica’s Quick Recipe Snapshot
Air Fryer Verified
- Single Layer Only: Never stack or overlap in the basket; circulating high-velocity air creates the crisp barrier.
- Oil Sprayer Tip: Lightly mist with high smoke-point avocado or light olive oil (never use commercial aerosol sprays with propellants).
- Halfway Shake / Flip: Flip pieces halfway through the cycle to ensure uniform convection browning.
The Golden Rule: Dry Surface, Thin Coat, Single Layer
Moisture is the enemy of crispiness. Water boils at 212°F, creating steam. Steam prevents the high heat needed for browning.
Always pat meat completely dry with paper towels. This simple step transforms texture dramatically. Next, apply oil sparingly.
Use a fine mist sprayer for even coverage. Too much oil causes smoking and greasy results. Just enough conducts heat to the surface.
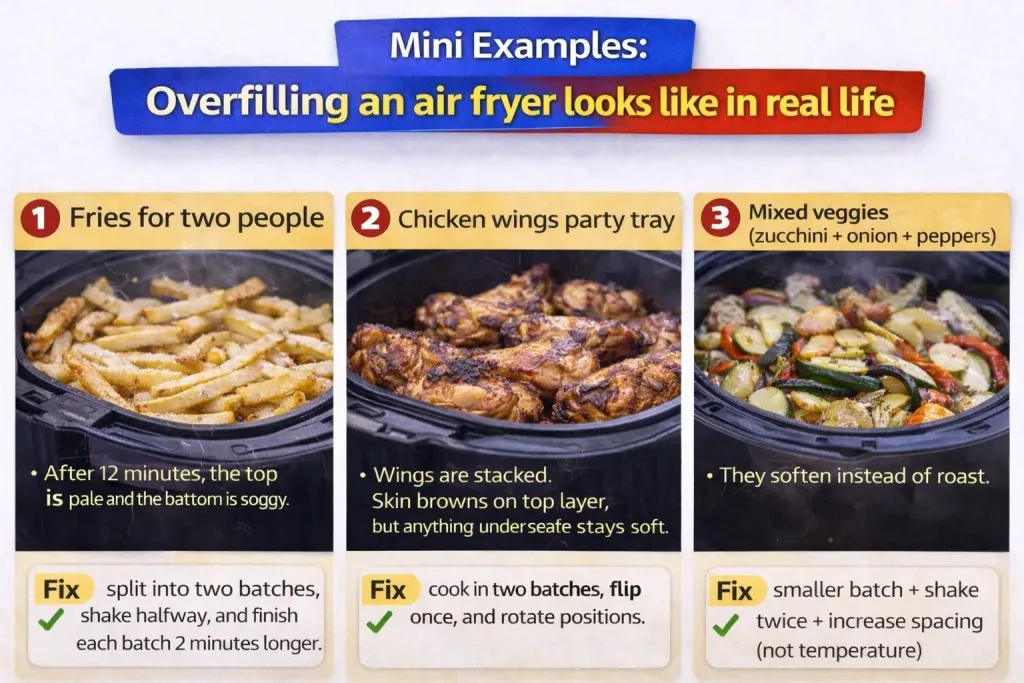
Finally, arrange meat in a single layer. Pieces must not touch or overlap. Hot air needs space to circulate freely.
Stacking creates cold spots and uneven cooking. The bottom piece steams while the top browns. Cook in batches if necessary.
Keep finished pieces warm in a low oven. This discipline ensures consistent results across every bite. Skipping these steps ruins even premium cuts.
Follow them religiously for professional-quality home cooking.
â±ï¸ Chef Jessica’s Quick Recipe Snapshot
Air Fryer Verified
- Single Layer Only: Never stack or overlap in the basket; circulating high-velocity air creates the crisp barrier.
- Oil Sprayer Tip: Lightly mist with high smoke-point avocado or light olive oil (never use commercial aerosol sprays with propellants).
- Halfway Shake / Flip: Flip pieces halfway through the cycle to ensure uniform convection browning.
Reading the Color Shift: From Raw to Perfectly Seared
Color tells you what’s happening chemically. For poultry, ignore the white flesh initially. Focus on the outer skin or coating.
It should shift from pale to golden amber. Dark brown spots indicate burning sugars or proteins. Reduce heat immediately if you see blackening.
For beef, look for uniform tanning. A good sear creates a flavorful crust. Gray patches mean insufficient heat contact.
Ensure the pan or basket is preheated properly.
Pork chops change from translucent pink to solid white-gray. Edges may curl slightly as they crisp. Lamb retains a pinkish hue internally at medium-rare.
Judge firmness alongside color for red meats. Rare feels soft like your cheek. Well-done feels hard like your forehead.
Medium sits somewhere in between. These tactile signs complement visual checks perfectly. Never rely on color alone for safety.
Use it for quality assessment only. Combine sight and touch for best outcomes.
â±ï¸ Chef Jessica’s Quick Recipe Snapshot
Air Fryer Verified
- Single Layer Only: Never stack or overlap in the basket; circulating high-velocity air creates the crisp barrier.
- Oil Sprayer Tip: Lightly mist with high smoke-point avocado or light olive oil (never use commercial aerosol sprays with propellants).
- Halfway Shake / Flip: Flip pieces halfway through the cycle to ensure uniform convection browning.
Spotting the Danger Zones: Burnt Marinades and Smoking Fats
Smoke signals trouble in two ways. First, excess fat drips onto heating elements. This vaporizes grease, causing acrid smoke.
Check your drip tray regularly. Add water if your model permits it. This catches grease before it burns.
Second, sugary glazes caramelize too fast. Honey and BBQ sauce burn below 350°F. Most air fryers run hotter than that.
Apply wet sauces only in the last few minutes. Use dry rubs for initial seasoning. Sugar-free options provide better control.
If you see black spots forming early, lower the temp. Extend the cook time slightly. This allows interior doneness without exterior charring.
Ventilation matters too. Blockages cause heat buildup and fire risks. Keep vents clear of debris.
Clean baskets thoroughly between uses. Residue accumulates quickly with fatty meats. Regular maintenance prevents hazardous situations.
Watch for wisps of white smoke. Act immediately to save your meal.
â±ï¸ Chef Jessica’s Quick Recipe Snapshot
Air Fryer Verified
- Single Layer Only: Never stack or overlap in the basket; circulating high-velocity air creates the crisp barrier.
- Oil Sprayer Tip: Lightly mist with high smoke-point avocado or light olive oil (never use commercial aerosol sprays with propellants).
- Halfway Shake / Flip: Flip pieces halfway through the cycle to ensure uniform convection browning.
Troubleshooting Common Visual Failures
Gray, wet exteriors mean overcrowding happened. The meat steamed itself in its own juices. Remove half the batch next time.
Pat remaining pieces dry again. Increase temperature by ten degrees Fahrenheit. Black spots with raw interiors suggest high sugar content.
Wipe off excess marinade before cooking. Switch to dry herb blends instead.
Uneven browning indicates poor airflow or positioning. Rotate the basket halfway through cooking. Flip individual pieces for symmetry.
Some models have weaker fans on one side. Excessive smoke points to pooled grease. Clean the bottom tray thoroughly.
Place a slice of bread underneath to absorb splatters. This old trick works surprisingly well. Address these issues proactively.
Prevention beats correction every single time.
â±ï¸ Chef Jessica’s Quick Recipe Snapshot
Air Fryer Verified
- Single Layer Only: Never stack or overlap in the basket; circulating high-velocity air creates the crisp barrier.
- Oil Sprayer Tip: Lightly mist with high smoke-point avocado or light olive oil (never use commercial aerosol sprays with propellants).
- Halfway Shake / Flip: Flip pieces halfway through the cycle to ensure uniform convection browning.
The Touch Test: Firmness Tells You What Thermometers Miss
A digital probe is the gold standard for safety. But learning to judge doneness by touch adds speed and intuition. This skill helps you calibrate your specific appliance quickly.
Different muscles react uniquely to heat exposure.
Chicken breasts tighten significantly as they cook. They become springy, then rigid when overdone. Thighs stay softer longer due to higher fat content.
For steak or chops, press gently with a finger. Rare feels soft, like touching your cheek below the eye. Medium offers moderate resistance, similar to chin firmness.
Well-done feels hard, like pressing your forehead.
Combine this tactile feedback with visual checks. If the surface looks seared but feels mushy, it’s undercooked. If it’s stiff but pale, you’ve likely dried it out.
Aggregate user reviews suggest that practicing this method reduces guesswork errors. It bridges the gap between raw data and culinary art. Use it alongside temperature readings for best results.
Never rely on touch alone for poultry safety. Always verify with a thermometer first.
â±ï¸ Chef Jessica’s Quick Recipe Snapshot
Air Fryer Verified
- Single Layer Only: Never stack or overlap in the basket; circulating high-velocity air creates the crisp barrier.
- Oil Sprayer Tip: Lightly mist with high smoke-point avocado or light olive oil (never use commercial aerosol sprays with propellants).
- Halfway Shake / Flip: Flip pieces halfway through the cycle to ensure uniform convection browning.
FAQs: Quick Answers for Air Fryer Meat Success
Can I cook frozen meat directly in the air fryer?
Yes, but expect longer times and less browning. Frozen releases water, which inhibits crisping. Thawing first yields better texture.
If cooking from frozen, reduce temp by 25°F. Add 50% more time. Check internal temperature frequently.
Do not assume standard recipes apply. Monitor closely to prevent uneven cooking.
Do I need to preheat my air fryer for meat?
For thick cuts like steaks, yes. Preheating ensures an immediate sear. This locks in juices effectively.
Thin items like burger patties matter less. Skip preheating for small batches. Save energy and time.
Manufacturer specs confirm varied recommendations. Follow your device manual guidelines. Adjust based on cut thickness.
Consistency improves with practice.
Why does my chicken breast come out dry?
Lean muscle fibers contract rapidly in high heat. Timing errors compound quickly in fast-cooking appliances. Brining helps retain moisture before cooking.
Pull at 160°F, not 165°F. Carryover cooking raises temp by five degrees. Rest for five minutes after removal.
Slice against the grain for tenderness. Avoid overcooking by watching visuals.
Is it safe to reuse the same basket for different meats?
Only if cleaned thoroughly between uses. Cross-contamination risks exist with raw poultry. Wash with hot soapy water always.
Sanitize surfaces to kill bacteria. Separate tools for raw and cooked foods. Prevents foodborne illness spread.
Follow USDA handling guidelines strictly. Hygiene protects household health. Never skip cleaning steps.
🗠Chef Recommended: Meat Thermometers & Crisper Tongs
To achieve juicy centers with crispy skin while hitting USDA food safety internal temperatures, our test kitchen relies on instant-read digital probes and silicone-tipped tongs:
- Instant-Read Digital Meat Thermometer:Check Digital Meat Thermometers on Amazon →
- Heat-Resistant Silicone-Tipped Tongs:Check Non-Stick Friendly Tongs on Amazon →
*FTC Disclosure: As an Amazon Associate, Air Fry Process earns from qualifying purchases.*

Similar Posts